
Design Project 4
-Not a Pun, It's a Real Life
Project Summary
Design Project 4 of the 1P10 course focused on meeting a client with Multiple Sclerosis (a disease which impacts motor control, vision, and mood) to assist them with specific difficulties caused by the condition. Our client was Bradley who had foot drop and numbness on both his legs. Leading to difficulty walking and running. Therefore we created an assistive device that guides the flexion of the foot so he's able to run and walk properly once again. With extensive brainstorming, modelling, and coding we created Ez-Step. Ez-step pulls the front part of the foot upward based on input from force-sensitive resistors and also displays data on an app. My role as a coordinator and modeller greatly helped the team stay on task, and achieve the final prototype. The prototype was then presented to fellow Ibiomed students. Overall allowing me to demonstrate and expand on skills I have harnessed throughout the years.
Hard Skills
Soft Skills
-
Modelling
-
Video Editing
-
Project Management
-
Teamwork
-
Critical thinking
-
Presenting
Background
For the design project, we learned about Bradley and how Multiple Sclerosis has impacted his life. Primarily affecting vision and motor control. For motor control, Bradley has foot drop, which is the inability to lift the front region of the foot when walking and running. This causes a lot of physical and mental stress, with the degrading ability to walk. For Bradley, running is also a beloved hobby. Therefore, we focused on creating a device that would assist Bradley in the flexion of the foot to be able to run once again. This will allow him to reap the benefits of a valued hobby and as a form of rehab for his condition.
Design Process
1. Initial brainstorming of the idea, the device would be lifted through a string. The force-sensitive resistor placement remained the same, but everything else was changed.
2. Created a low-fidelity prototype out of cardboard which would move based on a string and also an AutoCAD assembly for it.
3. After thinking about the feasibility of the device and functionality we decided to move on with a gear chain design, similar to a bike chain
4. Caded all the parts for this design, and started the code. The code would rotate the motor 45 degrees based on what force resistor was in contact with the ground.

Printed the parts and made the model. The model was then attached to the motor and connected to the force-sensitive resistor.
6. We made refinements to the presentation of the device by adding a board and changing the adapter piece to avoid the motor from spinning incorrectly.


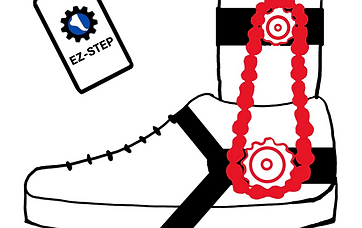
Final Prototype

Admin Role
For the design project, I was the coordinator. Where I'm responsible for taking notes for meetings. I kept a record of meetings and their notes, and regularly kept the group on track with deadlines.
Reflection and Lessons Learned
I learned a lot from design project 4. Diving into the project, we asked questions to Bradley to understand his situation better and then brainstormed ideas to better support him. Through this process, we focused on tackling his footdrop and then made designs and iterations before we settled on a mechanism we wanted to make. Initially, our designs were focused on using a gear train or string to pull the toe part of the foot upward. However, thinking about feasibility and flexibility, we decided to use a chain system. The chain system looked more complicated and might have been too heavy for the motor. Therefore, we created a backup plan of using a string if the mechanism fails. Luckily. the chain print ended up working. I primarily caded parts that held the motor and the gear on the shoe and felt I could have modelled more complicated parts. We then found many issues when trying to run the mechanism with the code. The motor would be kept failing, and the shoe was not moving smoothly. Despite the limited time we had to work the issues out, we kept finding ways to reduce friction and make the motor pull the shoe better. This resilience led us to find the main issue of the motor adapter not being tight enough. We then made changes to using acrylic to slide the shoe, made the presentation of the shoe horizontal, and made the adapter between the gear and the motor tighter. We then worked together to make slides on PowerPoint making sure to adhere to AODA and be professional.
We then presented the presentation to a group of fellow Ibiomed students. Additionally, we filmed a video showing our mechanism and describing the lessons we learned. Finally, I edited and filmed the video for my group.
I learned a lot of lessons on
-
optimizing resources for the best prototype
-
management of time
-
working under stress and adaptability
-
communicating effectively
-
AODA compliance
.